Showing posts with label bathroom. Show all posts

Saturday, January 1, 2011

a new year & a great deal for you!!

So did you all have a very Happy New Year?  Scott and I didn't really do anything special since he has to work today. We just hung out at home chowing down on some yummy appetizers and having a Rules of Engagement marathon.  Exciting, right? Honestly, I love just having a low key night with my favorite guy.  We never have been the type to do something uberly glamorous and that's okay with me.  We always have fun when we are together and so that works for me.


I am so excited that it's a brand new year and I know that this is going to be the a great one for us!!  I know that God has awesome things in store for us this year, and I can't wait to see what comes of 2011.  Yesterday Scott and I were talking about the "house to-do" list for 2011 and the biggest project we have it to finish our 2nd bathroom upstairs.  If you remember, when we built our home we only had them rough in the plumbing for our 2nd bath.  We are currently using it as a closet, but we really want to get it finished up this year not only because we will need it for our future little bambinos, but it will be so nice to a  full guest bathroom for company. 

With this in mind, I was so excited that I was contacted by Ovestock.com the other day! They asked me if I would be interested in working with them to offer a special discount to my readers.  Of course, I was SO thrilled about this and couldn't pass it up!  If you aren't familiar with Overstock.com, they only have everything and anything you could ever need, and not only that they ship your entire order no matter how big or small for only $2.95! Can you believe how great that is?! 

I absolutely love their site and if you remember I got my gorgeous kitchen chandelier from there. I am so glad that we got our chandelier from there! If you remember I had a horrible experience with the initial fixture I ordered, and thankfully I was able to get my money back for the first one that I ordered, and then went over to Overstock.com and bought the one we have.  Not only was their selection way more amazing, but I ended up saving $60 over the other fixture I had initially ordered from another site.  You absolutely cannot beat that!! After having the worst online ordering experience of my life, and then ordering from Overstock.com it was like night and day! There prices were great, the quality of the fixture is wonderful, and I received it so quickly! I can't believe that I didn't think of them in the first place, and I know that I won't make the same mistake again.

I was just browsing through their site, looking for all the things that we will need for our 2nd bathroom revamp and I found so many things that I am in love with!  Here's  a sampling of some of the things I am eying for the finishing touches we will need.
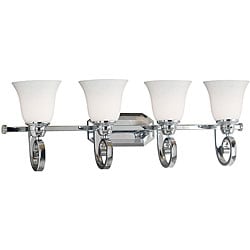
Love this light fixture! It's absolutely gorgeous and totally in our price range!
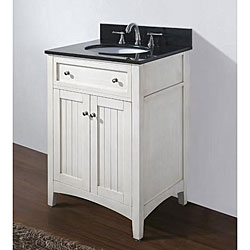

 How adorable is this vanity?! I love love love it, and it totally fits our style!


I am in LOVE with oval mirrors! We have one in our 1/2 bath and I really want to carry that into the next bathroom too!

So, here's the exciting part! They are offering all my readers a 10% discount on your next order with them!! Like I said there is so much on their site to choose from, that you can use this 10% off for almost anything you need.  What a great way to start a new year! I know I love saving when I can, and this is a great offer!

So, here's your code to save!! ?121745?

The code never expires, but can only be used once per email address.  I'm so excited to share this offer with you all and I really hope that it's something you take advantage of.  I know that I will! Big thanks to Overstock.com for offering this to my readers!

HAPPY NEW YEAR EVERYONE!!!!!!!!!!!!

 ***All the ideas and opinions expressed are my own. No monetary compensation was received for doing this post, however, I was provided with a discount code.*****

Saturday, October 23, 2010

master bath revamps part one {{jewelry hanger}}

So, well over a month ago the hubs and I FINALLY painted our master bathroom.  If you have followed my blog for any length of time, you know that my house has very white walls still.  It's the curse of building your own home....standard builder white walls.  We have slowly been working on painting rooms, it's not a money thing as much as a time thing.  Painting=a ton of work, and when you work full time, and are usually quite busy on the weekends, it's hard to dedicate a whole time out to just paint.  I love the end result, but it's tough getting there.

I am gonna show you guys the whole bathroom when it's all done, but I am still finishing up some last minute touches! For now, I am gonna give you a sneak peek at what I've been working on.  After the bathroom was painted, I knew I just needed to work on adding in some gorgeous accessories.  I don't know about you, but I have a constant problem of leaving my jewelry sitting all over the bathroom.  I knew that I needed to find some place to organize it all.

I found a frame that I loved at the thrift store, and I knew immediately that I wanted to add some chicken wire to help hang my jewelry.  I know you have seen all types of those revamps in blogland, but here's what I did.

I started off painting my frame glossy white.  I'm sorry I didn't get a beforehand pic, but the frame was an ugly gold brown.

I cut the chicken wire down to size, and then painted it lightly with the same glossy white spray paint.  I didn't like how harsh the steel color looked against the frame, but I didn't want it to be too white.
Then, I hot glued the chicken wire into the back of the frame.  It was a bit of a challenge getting it to work, but after I got the hang of it, it was a breeze!!  I actually love how simple it was to do, and it adds such a gorgeous touch to the frame.

So, here's the final product all hung up! 

Ahhhh!! Isn't she pretty??? My bathroom colors are chocolate brown, and light blue, and I thought that adding a little brown bow to the top was the perfect touch!

I am planning on getting a pretty hook to hang it on, probably from Anthropologie to add a more finished looking touch to it.

Now, I finally have a place to hang all my jewelry, and even some hair accessories!  This baby totally beats just dropping them on the bathroom counter.  I couldn't love it any more!


Ahhh, I love love love it!! <3  I hope you guys do too!! Can't wait to hear what you think! :)

Tuesday, January 19, 2010

i'm dreaming of...

Blog much?!?! I'm sorry I have been MIA, but things have been busy the past month and I've neglected my sweet little blog.

This Spring, we are going to be finishing our 2nd bathroom upstairs.  Right now, we just have the plumbing roughed in but that is soon to change!!! I have been dreaming about what I want to do with it, and although some of my dreams will be just dreams, I thought I would share my inspirations with you!!


Chandelier=L-O-V-E & the ruffle shower curtain is to die for!


Beadboard...yes please!


How adorable are these?  Cute touch for a kids bathroom which mine will be (eventually!)


Ahh!! I'm in love! Maybe in my NEXT house! :)


I'm thinking I could easily replicate this baby!


Anything baby blue is good in my book!


Um, can you say GORGEOUS!! I want that mirror!!


Everyone's gotta have a dream, right???

Monday, September 7, 2009

beauty is in the eye of the beholder

On my latest drab to fab makeover quest, I came across one little item at the thrift store that had the potential to be something grand. As I was browsing through the furniture section at the thrift store, wishing that I had a vehicle big enough to bring some of the larger pieces home with me, I bumped into this little baby.
Now I know what you are thinking, "Seriously, someone actually etched birds into the glass and intended it the focal feature?" I had the same thought. I almost passed by this little baby, but with a price tag of $1.95 how could I pass up? It's real wood and at that price, I just had to snag it up! I don't blame the original owner for tossing this little baby to the curb, but I knew with some TLC it would be no longer be neglected as it had been.

I headed to Home Depot and purchased my spray paint colors of choice and got right to work! First I removed all the hooks from the board which was not an easy task as they had gunk on them and made it difficult to remove. After I removed all the hooks, I sanded it down and then went to town spray painting. The color I choose was Rustoleum Heirloom White. I love love love white wood so it was an obvious choice!
I did a couple coats on the wood, I think 3 total and after that was done it looked a little something like this.
Already looking SO much better!!! For the hooks I decided to paint those an espresso brown color. Originally I had intended to use this in my master bathroom to hold my jewelry which ended up not working out because there is no wall large enough that isn't already in use to put it on. Anyways, I said that all to say that we have dark chocolate/espresso brown woods in my master bed/bathroom so it was the perfect fit.
So, I didn't get a picture of the hooks in the gold to brown fix-up process, but I am sure you are all well familiar with how that goes. I did a couple coats on the screws & hook and it is simply amazing what spray paint can do!! Here is a picture of the hooks reattached on the shelf after they got their sprucing up.


Again, already looking GORGEOUS, but we still aren't done yet!!

Now, for the center of the shelf (where the UGLY birds used to be) I decided to pop that off the shelf, it was held up by some thick construction paper like backing and some staples (heavy duty) but it come off really easy, and then I coated it with some...great ready for this....chalkboard paint! Are you suprised? Yah, didn't think so. I am obessed I know. I did 2 coats of the chalkboard paint on the mirror.
So now comes the big completion (my favorite part..especially since I am so impatient in the fix-up process!!!) Since I had removed what was holding the mirror up I needed to figure out a more permanent solution to reattached it to the shelf. GLUE GUN TO THE RESCUE!!!
I glued the endges of the mirror to the back of the frame and made sure it was secure on their before flipping it up. Finally, my favorite part had come, the end result all put together!!!


Don't you just love it?! Who would have thought that ugly ducking shelf for $1.95 could turn out to be something so pretty? I simply love it. Now I know you are thinking where is this shelf going to go since my original intention for it was a no go. Well, as I have said before my house is still very much a work in progress. This is our 2nd full bathroom.

Okay, I know it doesn't look like much NOW but in the spring (if all goes as planned) this will be a finished FULL 2nd bathroom. Our builders already roughed in the plumbing for us so we need just to piece it together and as you see already my lovely little shelf will reside here. I can't wait until I can post pics of a complete bathroom with this adorable little shelf in use! So, next time you see an ugly duckling don't be afraid to snatch it up and turn it into something gorgeous! And really for $6 total to fix up this little baby...you just can't go wrong!!

I wanted to share another new little feature in my home. I got this gorgeous night light on sale at Kirklands today for $6 (originally $10) and I am in love!! I am a sucker for any kind of monogram and I just don't think you can find a cuter night light than this!


I can't wait to hear your thoughts on my new additions, so please let me hear them!! :)
Sending you lots of love!
xoxo
Kimmy

I added this post to the Shanty 2 Chic Rustoleum Revamp Party!!
Shanty 2 Chic

Related Posts with Thumbnails